 My Basket (0)
Recently added item(s)×
 My Basket (0)
Recently added item(s)×
SAFETY FIRST! Never attempt to access the work area with an unsupported ladder or without a stable deck. Always use a full scaffold platform or a purpose made cantilevered deck system with guard rails in place.
Full health and Safety information is available on request.
By law all asbestos materials must be removed by trained operatives under strictly controlled conditions. If you suspect that asbestos is present you should consult your Local Authority.
Load and unload by hand and support both ends of a 5m length when handling. Stack no higher than 1m, in packing sleeve on a flat base.Avoid contact with solvents, paint, creosote, bitumen etc.
Use conventional carpentry tools including fine toothed saws. Power tools may be run at speeds appropriate for timber. Nail and screw holes do not require pre-drilling.
Contractors for new build and refurbishment works should be aware that larger off-cuts from some boards may have been scheduled for use in other areas of the installation and should be handled carefully until their use is established.
Replacement fascia boards (16mm thick or thicker) are able to support the weight of the lower row of tiles without the need for a tilt fillet or kick plate.
Edge Building Products A4 grade stainless steel plastic headed nails or capped screws. See below table.
| Product | Fixing | Qty of fixings | Max Fixing Centres |
| Replacement Fascia RSF (16mm) & JSF (20mm) | PT65 (65mm nail) | 2 | White 600mm Foiled 400mm |
| Capping Fascia CSF (9mm) | PT50 (50mm nail) | 2 | White 600mm Foiled 400mm |
| Soffit & Vented Soffit FS/VS (9mm) | PT40 (40mm pin) | 2 | White 600mm Foiled 400mm |
Always leave a minimum 4mm expansion gap at the end of each board, ie where two boards meet leave 8mm overall.
Use Edge ESLM low modulus silicone. Use a primer when bonding to GRP, stainless steel, aluminium or untreated wood. Do not use with polycarbonate sheet.
IMPORTANT – Roof voids must be ventilated in order to stop warm air condensing on cold surfaces. Condensation encourages rot and mould growth. See below for ventilation options.
Compliance with these ventilation standards is required on all buildings, except those that were constructed without ventilation provision or predate the Buildings Regulations. However we recommend that adequate ventilation is provided on all refurbishment projects regardless of age.
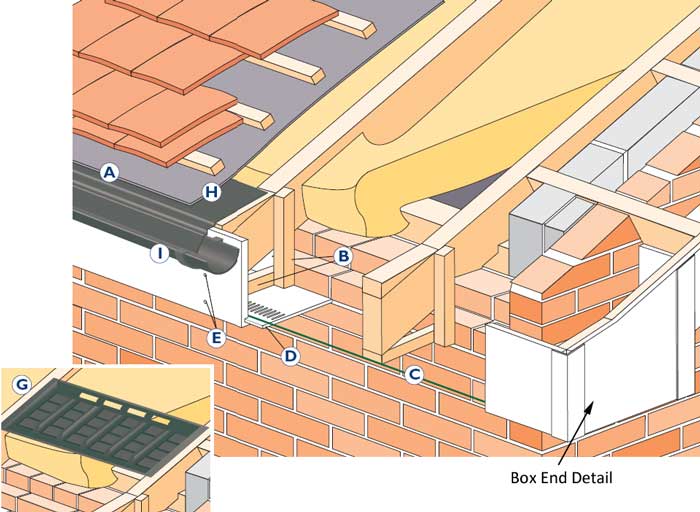
A. Cut back rotted felt to a clean edge.
B. Fit suitable timber hangers (preservative treated) to support soffit boards. Screw to rafter sides checking for level. Deep soffits must be nailed up every 200mm max across their depth. Set up support at hipped corners.
C. Set up string lines to check vertical/horizontal faces of rafter feet and hangers for straight and level.
D. Nail soffit board to hanger. Inner edge of soffit abuts to wall or sits on bricks. Outer edge of soffit should over hang by 10mm to fit groove in back of fascia board.
E. Nail fascia board to rafter feet with sufficient height to create tile kick. Allow for height of over fascia ventilator if required.
F. Make soffit and fascia joints between rafters.
G. Eaves ventilation trays maybe required to ensure air flow past roof insulation material.
H. Underdress existing felt with dpc material or eaves protectors (EP1500). New material must dress into the gutter.
I. Fit gutter brackets directly to fascias, click here for guttering installation guide.
J. Fix corners and joints using Fixall flexible adhesive, this is important as it allows the boards can expand and contract. We recommend pre-drilling each corner/joint and fixing with at least 1 plastic headed pin to hold the fitting in place on 1 side of the joint. NB, fixing with a non flexible adheisve or pinning both sides of the corners and joints will result in cracking of the corners and joints.

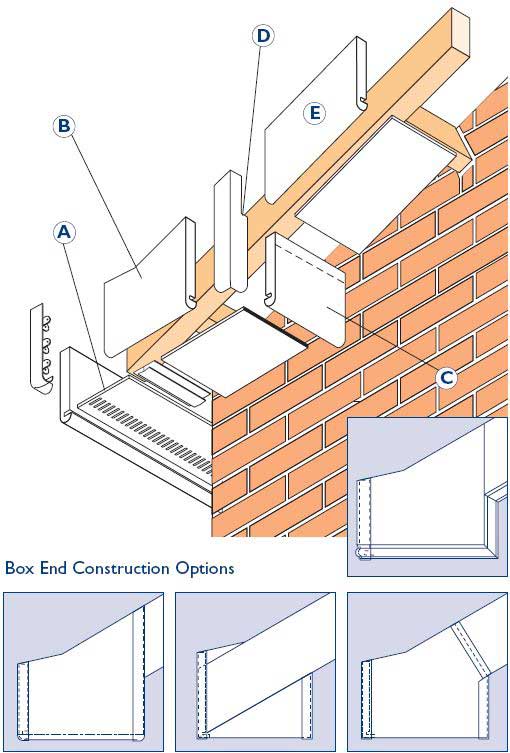
Note: Timber hangers should be installed as required to locate box end structure.
Our roofline assembly graphic shows how the box end components fit together.
A. Finish fascia level with the face of the rafter gable. Soffit should over hang by 10mm and may be cut square or mitred.
B. Measure and cut box end from a deep board. Front edge should tilt up to match height of fascia board.
C. Measure and cut fascia to form the return to gable wall.
D. Remove section from corner joint to fit around rafter.
E. Fix bargeboard directly to gable rafter.
