 My Basket (0)
Recently added item(s)×
 My Basket (0)
Recently added item(s)×
In general cellular PVC cladding may be used on any building that is less than 18m tall and where the relevant boundary, i.e. a potential source of external ignition such as another building, is 1m or more away from the wall to which it is fixed.
An exception to this is in the case of a public assembly or recreational building where cellular PVC cladding may only be applied from 10m and upwards above ground level or above the floor level of any external area to which the public have access.
Full details may be found in Volume 2, Section 12 of the National Building Regulations.
SAFETY FIRST! Never attempt to access the work area with an unsupported ladder or without a stable deck. Always use a full scaffold platform or a purpose made cantilevered deck system with guard rails in place.
Full health and Safety information is available on request.
By law all asbestos materials must be removed by trained operatives under strictly controlled conditions. If you suspect that asbestos is present you should consult your Local Authority.
Load and unload by hand and support both ends of a 5m length when handling. Stack no higher than 1m, in packing sleeve on a flat base.Avoid contact with solvents, paint, creosote, bitumen etc.
Use conventional carpentry tools including fine toothed saws. Power tools may be run at speeds appropriate for timber. Nail and screw holes do not require pre-drilling.
Contractors for new build and refurbishment works should be aware that larger off-cuts from some boards may have been scheduled for use in other areas of the installation and should be handled carefully until their use is established.
Edge Building Products A4 grade stainless steel cladding pins (CP30SS) or screws. Maximum fixing centres of 400mm. The plank ends must always be fixed regardless of nearest fixing centre.
Always leave a minimum 4mm expansion gap at the end of each board, ie where two boards meet leave 8mm overall.
Use Edge ESLM low modulus silicone. Use a primer when bonding to GRP, stainless steel, aluminium or untreated wood. Do not use with polycarbonate sheet.
Foiled and coloured cladding has the potential to absorb heat and therefore adequate provision must be made to allow this heat to disperse from behind the installation. Important installation criteria to observe are as follows:-
(1) Allow a minimum 50mm vented airspace to the rear of the cladding installation.
(2) At the bottom edge of the cladding, omit the horizontal batten to allow a free air path between vertical battens. Similarly, the ventilation path must not be obstructed at the top of the clad area. Continuity of the ventilation path should be achieved by venting into the eaves or leaving a 10mm air gap between the cladding and soffit. Angle ventilator VA6015 can be installed to stop insect ingress.
(3) Install cladding onto good quality, treated softwood battens (min. 50 x 38mm) fixed at maximum 400mm centres.
(4) Cladding planks should not be greater than 5m long.
(5) Fix cladding with 30mm annular ring-shank stanless steel nails (CP30SS) from the centre outwards. Ensure all board ends are securely nailed to battens.
(6) At joints use a two-part joint trim or butt joint, allowing an 8mm expansion gap at each board end.
(7) At all end abutments, corners and top edge terminations, allow an 8mm expansion gap, and ensure ends are fixed.
(8) Installations should take place at ambient air temperatures between 5oC and 25oC
(9) Prior to installation, all products should be stored on a flat surface, out of direct sunlight at all times.
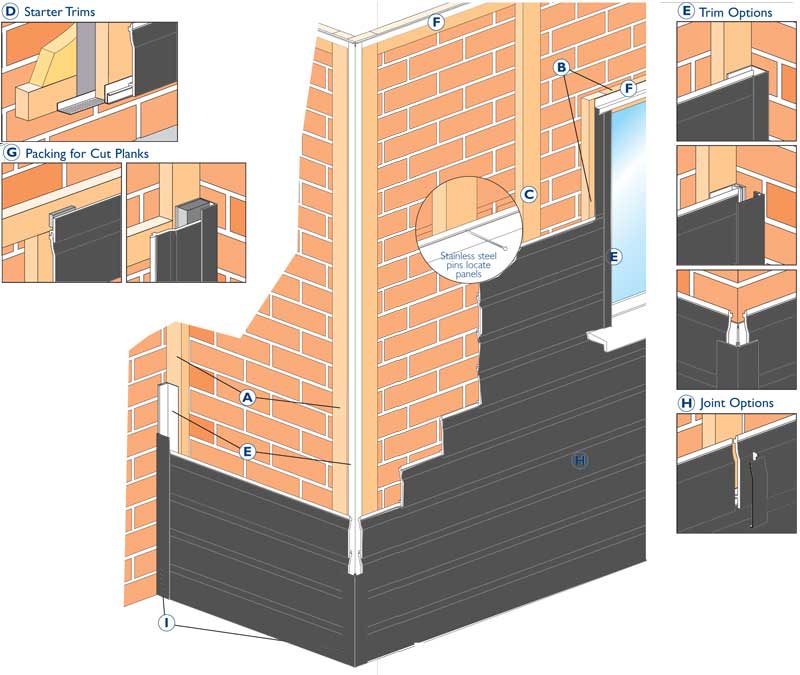
A. Perimeter frame battens (recommended 25 x 38mm)
B. Battens around openings
C. Intermediate vertical battens
D. Starter trims (or bottom angle ventilation strip, as appropriate, see inset illustrations)
E. Vertical perimeter trims, corner trims (where two-part trims are used, fix only the inner part)
F. Top perimeter trims (These engage inside the vertical trims)
G. Packings to battens as required for any cut planks
H. Plank profiles and joint covers or centre joint trims as appropriate.
I. Outer components of two-part trims.
